Taste of winter

Happy New Year!

New year means new colouring opportunities, even more so this year as I was very lucky and received a full Prismacolor pencils set for Christmas from my boyfriend! I still haven’t dared to touch them, though, and the copics will probably continue to be my favourites.

A new years also means new challenges and fun at Copic Marker Norge. To kick off the year we have a Winter themed challenge starting today and this is my inspirational card using a Mo Manning image from Mo’s Digital Pencil called Taste of Winter.

I used various embellishments from Wild Orchid Crafts, Live and Love Crafts, Noor Design, Panduro and Dovecraft.

Copics used: (skin) E000, E00, E04, E11, (hair, sledge and trousers) E42, E43, E44, E47, (jacket and hat) W1, W3, W5, W7, G40, G82, G94, G99, (scarf and mittens) G40, G82, (shoes) 100, W3, W5, W7 , (sky) B000, B91, B93, (star) Y04, Y17, YR04

Decorated box for knitting needles

Something unusual is about to happen. I’m going to make a post that contains something other than a card! It’s been so long since that happened that I don’t even remember when it was.. However, what time other than right before Christmas is the perfect time to suggest what to make as a gift?

I have this great co-worker who knitted me some mittens, two pairs and gave me have a third to be exact (spoilt much? :D), so I wanted to make something in return, in addition to a card. I decided on making something she could have her knitting needles in. The choice fell on a pringles can. Before I started decorating it, I painted the whole can with a coat of white acrylic paint so the print wouldn’t accidentally end up showing through…

I cut the length I wanted on two different coloured papers and then measured around the box before cutting it to fit. Then I measured the remaining space before I cut the third piece. I used the same measurements for around the can for the various ribbons and lace. The ribbons and lace are from Wild Orhic Crafts, Live and Love Crafts and a local shop, as are the flowers on top of the can.

The image I decided to colour up is by Tiddly Inks, clearly one of my favourite images for this time of year. I chose it as it doesn’t have to be for Christmas, but still gives a wintery feeling. It is coloured up with Copics.

All around the bottom bit I have glued on small pine cones, and around the can from one end of the cut out coloured image to another I have added die cut trees that I have painted with white acrylic paint, at the back there is also a die cut deer. All the die cuts are made with Noor Design dies.

This project is also featured on the 20th of December at Copic Marker Norge as part of our advent inspiration. I suggest you go take a look at what the design team girls have come up with to inspire you for the holiday.

I have used the following copics for this: (skin)E000, E00, E04, E11, (hair) E08, E18, E19, E49, E97, (snow) C1, C3, C5, (clothes) B91, B93, B95, B97, B99, (hat) W1, W3, W5, W7, 100

Warm snowman hugs

Another inspirational card now that Christmas is drawing nearer. My first this year in the more traditional colours of red and white. I don’t normally keep my cards this white. It was a bit of a challenge to try to keep the white reasonably white for a change as I wanted to have just a small contrast in the shading of the white. In fact, I used far less copics than I usually do! The stamp is by Lili of the Valley and their stuff is now available as digital stamps so I have a feeling I’ll acquire more of theirs pretty soon! The dies are from Noor Design and the lace from Live and Love Crafts, it is definitely my favourite lace.. can you tell? Heh

card426_1

Copics used: (snowmen) C1, C3, C5, (reds) R22, R24, R27, R89, (sky) B0000, B000

James Bear – then and now.

It is great really, this 5 year birthday celebration Copic Marker Norge is having. It coincides pretty perfectly with my own 5 year of colouring and creating cards. I bought my first craft supplies in August 2011, set up my blog and made my first card in September the same year, and here I am five years later.

As a part of the celebrations the design team were challenged to re-colour one image to show our colouring progress over the years. I decided to go with an image for a card I put up in november 2011, which is labelled in my files as my card number 14. The new one I will post afterwards is over 400 cards later. That is a lot of cards, I admit. The image used to show said progression is by Lili of the Valley and here is my old card:

Christmas - Teddy with presents

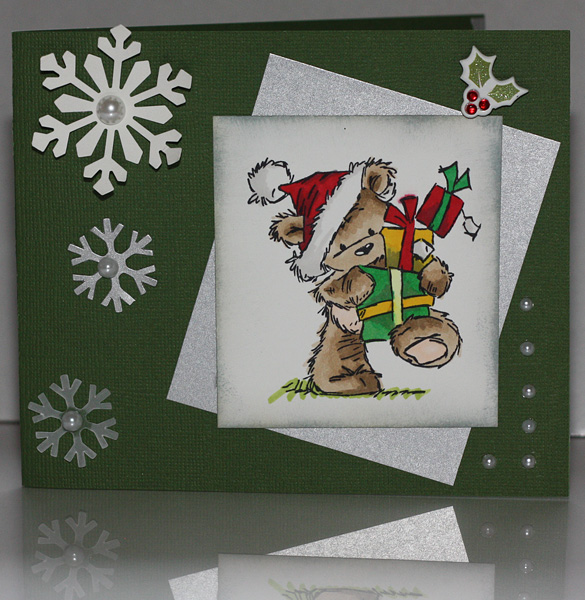
As you can see I didn’t have a lot of crafting supplies, but at least I had a couple of shades to go together so that the image isn’t entirely flat. Since then the collection of most things craft related has grown immensely, and I use at least three shades per colour, sometimes more, and ideally going from very dark to reasonably light to get prominent shadows and more depth. Here is my new, re-coloured, version of this image.

card422_1

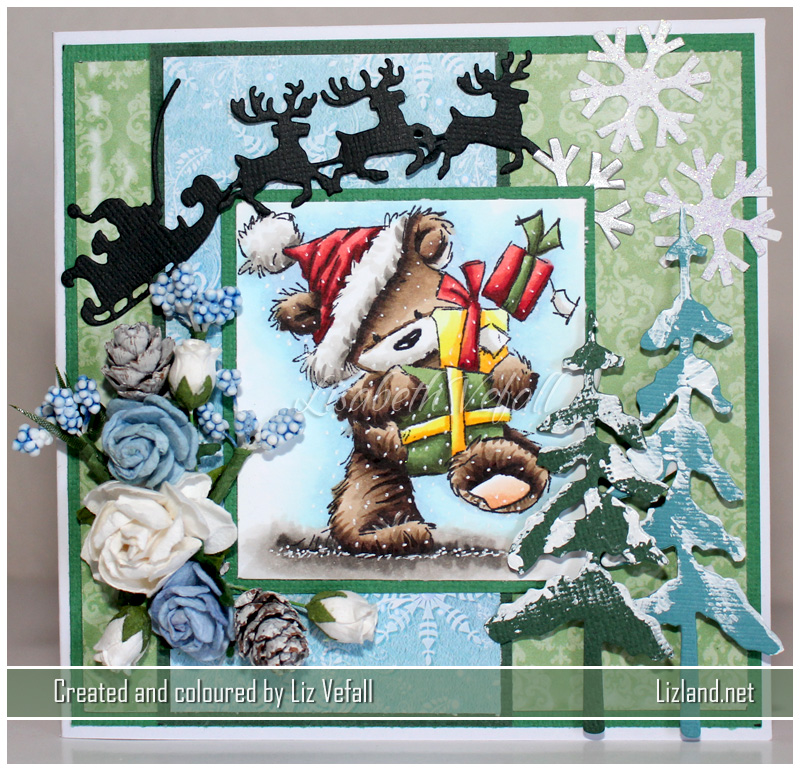
It does look like I fell into the contrast well, doesn’t it? Also it would appear that the shadows seem to, well.. make more sense and fall more naturally. Hahaha. I admit it was a lot of fun to view my own progression. We are all very good at viewing other people’s progression and comment and compliment it, while we completely ignore our own. That can be destructive. The past half a year I have struggled with both motivation and inspiration to colour and make cards. I have a feeling that this small challenge might just have made all the difference. All I needed was to take a step back and go “you know what, it’s pretty decent. Keep it up”. One day I’ll make another comparison and hopefully the progress will be equally visible then.

I suggest you all do the same. Pick one of the first images you coloured, re-colour it, and view your own progression. You have probably come a much longer way than you think you. Pat yourself on the back. Be pleased with your own efforts and progression. Because you did that. You. And no one else.

Some of the other bits I used on this card are by Noor Design, Live and Love Crafts as well as Wild Orchid Crafts. And if you haven’t spotted it yet, yes I have used the same snowflakes that I did five years ago, because why not?

Copics used: (bear) E000, E21, E42, E44, E47, E49, E95 (hat) R22, R27, R89, W1, W2, W3, W5, (presents) G82, G94, G99, Y00, Y04, Y17, R22, R24, R29, R89, (sky and ground) B0000, B000, B91, W1, W2, W3, W5, W7 and a white pen.

Tulipa

New year, new cards. This is the second one I have made this year. (I will put up the other one later in the week.) There is a design team call going over at Art by Mi Ran. I had decided against entering as the entries they have so really quite good, but when I woke up this morning I thought ‘meh, why not’. It was an excellent excuse to colouring up an image instead of doing other stuff this morning anyway!

One of the things I wish to work on this year is my colouring. I feel I am improving, but it’s going to take a lot of practice to get anywhere near as good as I’d like, heh. I am still going through the skin and hair class over at Kit and Clowder, and it is just great! I hope to find enough time to finish that classes this month! (And maybe start on the clothing one after..)

I have, obviously, used an Art by Mi Ran image, it is called Tulipa. I have coloured it in with copics, but instead of using black and grey for the hair I have used the BV20s. The pink paper I have used is from a Tim Holtz pad (hey, at least I remembered one of them!) and the blue was some left over paper I had that seemed to fit perfectly. I have used distress ink on the base of the card and butterflies by Noor Design. All the flowers are by Wild Orchid Crafts, as always. The sentiment is a Lili of the Valley stamp.

card313_1

As I changed my mind and decided to enter in said DT call, I guess I should provide some additional half useful information! The reason I decided to apply is that I love Mi Ran’s images, they are so very pretty! As you can see from the art I have used on the cards in this post, I am particularly fond of the cropped images.They are also a bit challenging to colour, at least for me, and therefore an excellent way to practice getting better, I think. I would love to show off these lovely images as a part of their team. As I am not on any design teams at present I would be able to fully devote my spare time to this design team. Here are a couple of other cards I have made with Mi Ran’s images, one of which I entered in their challenges and won a guest design spot, and the other I made for said guest spot. (Both cards are linked to their own posts.)

card288_1  card310_1

I have also entered it into the Art by Mi Ran facebook challenge.